- Creating a Forum
- Creating a Topic
- Creating a Thread
- Replying to a Thread
- Group Discussions
- Enabling a Group Topic Blazon
- Setting Group Restrictions
- Video Tutorials
Discussions are a neat way to increment collaboration and engagement in an online class. Sharing ideas about course content can assistance your learners understand the perspectives of their peers and reverberate on what they take learned. You tin fix upwardly forums and topics for users to enquire questions, talk over class content and assignments, and work together in assigned groups and sections.
→For tips on how to use Discussion Forums in D2L Brightspace, visit the D2L video tutorial: All-time Practices for using a Give-and-take Forum in Brightspace
The Brightspace Word tool contains four parts:
| Forums | The discussion forum is a category: it organizes all related discussion topics. All discussion topics must be in a forum. Instructors must have a forum before they tin can create a topic. The number of forums created is up to you; some people use i forum to hold all discussion topics, others prefer to have multiple forums to concur discussion topics. |
| Topics | A Topic holds all of the discussion posts and threads on a given discipline and information technology MUST exist office of a forum. This is where the discussions are read and responded to. |
| T hreads | A thread is a learner'south post in a discussion topic. Students tin create a discussion thread or reply to a thread started by a classmate. A thread is part of a topic and a topic belongs to a forum. |
| Answer | If a user responds to another user's post, information technology is a reply. A reply is a function of the original poster's thread. |
Example of how word topics are displayed within a forum:
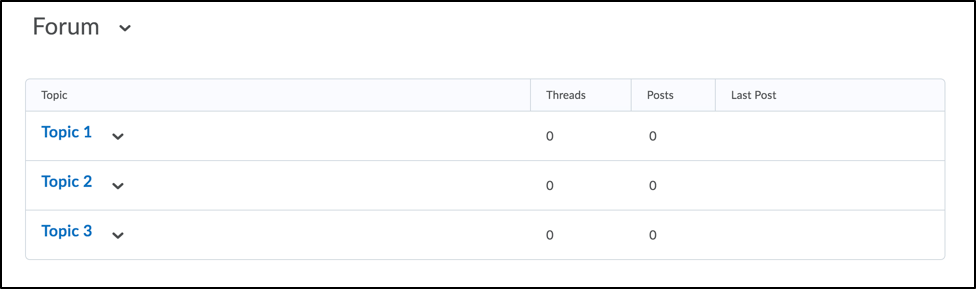
Warning: Discussions CANNOT happen in an empty forum without one or more than topics. The forum is the higher level category, just the Topic is where the discussion threads occur.
Creating a Forum |
- Log in to Brightspace with your MyCarletonOne credentials.
- On theBrightspace homepage, locate your course in one of the post-obit ways:
-
- Click on the grade tile under theMy Courseswidget.
- Click theCourse Selector Grid
 and select the form from the drop-down menu. If you are enrolled in more than than 20 courses, you can search for the course proper noun using the search bar. and select the form from the drop-down menu. If you are enrolled in more than than 20 courses, you can search for the course proper noun using the search bar. - In the navbar, click Tools.
 - In the drop-down carte du jour, select Discussions.
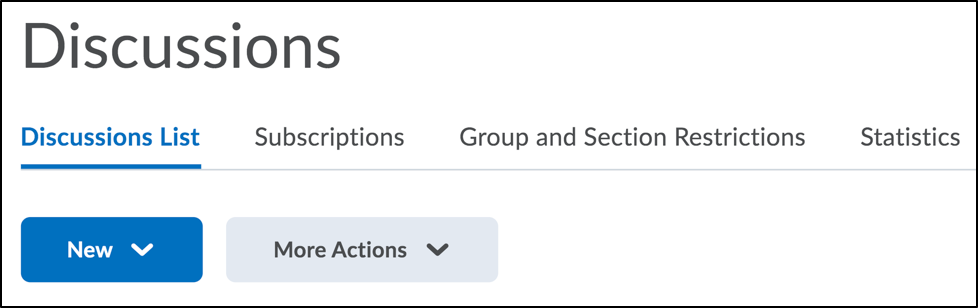
- Under the Discussions List tab, click the New push button.
 - In the drop-downwardly menu, select New Forum.
- Enter a title for your new forum.
- Enter a description for your new forum (optional).
- In the Options department, customize your forum using one or more of the post-obit check boxes: Note: If y'all apply settings at the forum level, all topics in that forum will share these settings. If you prefer to accept different settings for each topic, utilise the desired settings inside the topic itself.
- Allow anonymous posts– Enables users to post anonymously; Names will not exist displayed.
Notation: Bearding posts cannot exist evaluated. - A moderator must approve individual posts before they brandish in the forum– To ensure that posts are approved by a moderator before they display in the forum.
- Users must kickoff a thread before they can read and respond to other threads in each topic– To ensure user participation.
- Display forum descriptions in topics– To provide instructors the option to display a give-and-take forum clarification within a discussion topic clarification.
- Under the Restrictions tab, you take the option to set Start and End Dates to limit when students tin can admission the Forum and customize the extent of their access exterior of those times:
- Visible with access restricted before start / after end: Students can run into that the Forum exists only cannot see whatever of the Topics in information technology. Only the Forum title, Start/End Dates, and restrictions will exist visible to the students.
- Visible with submission restricted earlier start / after stop: I.e., read only. Students can enter the Forum'southward Topics to view the description and attached rubrics and to read threads and replies. Just they cannot postal service new threads or replies in the Topics.
- Hidden before showtime / afterward terminate: Students will non be able to see that the Forum (or any Topic in it) exists, and it will not announced in the Calendar.
NOTE: Forums are set to Visible with access restricted by default. Y'all tin change this default for your course by clicking on the Settings push at the acme of the Discussions page and adjusting the Availability Condition Defaults. - Click Salve and Close.
Y'all have now created a Word forum and need to add together at least ane topic in gild for students to be able to post. |
Creating a Topic |
- Log in to Brightspace with your MyCarletonOne credentials.
- On your Brightspace homepage, locate your course in i of the following ways:
- Click on your class under My Courses.
- Click the Course selector grid , then search for your class name or select your course from the drop-downward menu.
- Click Tools in the form navbar.
- In the drop-downwardly carte du jour, select Discussions.
- Under the Discussions List tab, click the New push.
- In the driblet-downwardly carte, select New Topic.
- Nether the Backdrop tab, enter the following New Topic Details:
- From the Forum drib-down listing, select the forum y'all want to place your topic in or click New Forum to create a new forum for your topic.
- Enter a topic title.
- Enter a topic clarification (optional).
- Under Options, you tin select one or more of the following settings:
- Allow anonymous posts– Selecting this option allows users to post anonymously to the topic. Anonymous posts brandish with the author "Bearding" in the thread.
- A moderator must approve individual posts before they display in the topic – Selecting this option volition require a moderator to corroborate posts in this topic before they display to users.
- Users must start a thread before they tin read and answer to other threads – Selecting this pick will require a user to start a new thread in the topic before viewing or replying to other threads in the topic. If this topic requires post approval, users will non be able to view or reply to other threads until their thread is approved.
- Under Rate posts, you accept the option to enable mail ratings for the discussion topic. Yous can choose from the following rating schemes:
- No Ratings (Default) hides all rating controls from users.
- Five-Star Rating Scheme allows users to assign each post a score out of five.
- Up Vote/Down Vote Rating Scheme allows users to increase or subtract a post's rating.
- Up Vote Just Rating Scheme allows users to increase a postal service'due south rating.
- To grant everyone admission to the topic and restrict learners to merely see threads from their own group or department, under Topic Type, selectGrouping or section topic.
WARNING: Yous cannot edit the topic blazon once you save the topic. - Enter your New Topic Details including title, description, options, ratings.
TIP:Options accept three additional settings that may exist beneficial for a discussion forum including anonymous posting, posts to be approved past a moderator, and posting earlier viewing other threads on the give-and-take forum. Use your discretion which option(s) y'all would similar to employ to your give-and-take topic. NOTE: Forums are set up to Visible with access restricted by default. You can change this default for your course past clicking on the Settings button at the tiptop of the Discussions page and adjusting the Availability Condition Defaults. NOTE: Forums are set to Visible with access restricted by default. You tin can change this default for your grade by clicking on the Settings button at the meridian of the Discussions folio and adjusting the Availability Condition Defaults. - Nether the Restrictions tab, you accept the pick to fix Kickoff and End Dates to limit when students can access the Topic and customize the extent of their access outside of those times:
- Visible with access restricted before start / afterwards end: Students can encounter that the Topic exists merely cannot enter it. Only the Topic championship, Offset/Terminate Dates, and restrictions will be visible to the students.
- Visible with submission restricted before start / later terminate: I.due east., read just. Students tin can enter the Topic to view the description and fastened rubrics and to read threads and replies. But they cannot postal service new threads or replies.
- Subconscious earlier start / afterward stop: Students will not exist able to see that the Topic exists, and it will not announced in the Calendar.
NOTE: Forum availability restrictions have precedence over any availability restrictions assail Topics. As such, you lot can utilise this combination of admission and visibility settings to provide students with general instructions for the Give-and-take activity in the Forum description prior to giving them access to the Topics and its specific instructions. - Click Save and Shut. You accept now created a topic under a give-and-take forum. You may wish to add more than topics to the give-and-take forum by repeating the steps above.
|
Creating a Thread |
- Log in to Brightspace with your MyCarletonOne credentials.
- On your Brightspace homepage, locate your form in one of the post-obit ways:
- Click on your course nether My Courses.
- Click the Course selector filigree , then search for your class proper noun or select your course from the drop-downward menu.
- Click Tools in the grade navbar.
 - In the drop-downwards carte du jour, select Discussions.
- Click the topic where you lot want to create a thread.
- Click Showtime a New Thread.
- Enter a subject field.
- Enter your post.
- Ready whatever of the following posting options:
- To keep the thread at the tiptop of the list, select the Pin Thread checkbox.
- To post anonymously, select Mail service as Anonymous.
- To receive updates on the thread using your selected notification method, select Subscribe to this thread.
- To attach a file, in the Attachments area, clickBrowse to locate the file that yous want to attach.
- To attach an audio recording, in the Attachments area, clickRecord Audio > Record. To make adjustments to your microphone option and volume, clickWink Settings. To listen to your recording, click Play. To erase your recording, clickClear. If you have prerecorded audio and are using a supported browser, you can drag audio files onto the attachments upload target.
- To attach a video recording, in theAttachments area, clickTape Video >Allow >Record. When you finish recording, clickStop. To erase your recording, click Clear. To add the recording, clickAdd together. If yous have pre-recorded video and are using a supported browser, you tin drag video files onto the attachments upload target.
- To post your thread to more than one topic, clickPost to other topics. Click Add Topics. Select the topics that you desire your thread to appear in. To post in every topic simultaneously, select theSelect All cheque box and and so click Add together Topics.
- Click Mail service. If the topic is moderated, your post will non appear until a moderator approves it.
|
Replying to a Thread |
- Log in to Brightspace with your MyCarletonOne credentials.
- On your Brightspace homepage, locate your course in one of the following means:
- Click on your class under My Courses.
- Click the Course selector grid , so search for your course name or select your course from the driblet-down menu.
- Click Tools in the form navbar.
- In the drop-downward carte, select Discussions.
- Locate the thread yous want to reply to.
- Practice either of the following:
- To reply to the chief thread post, click Reply to Thread.
- To reply to a particular post inside the thread, click Reply.
- Enter your reply in the HTML Editor. To include the original postal service's text in your reply, click the Add original post text
- Set any of the following options:
- To mail anonymously, select Postal service as Anonymous.
- To receive updates on the thread using your selected notification method, select Subscribe to this thread.
- To adhere a file, in the Attachments expanse, clickBrowse to locate the file you want to attach.
- To attach an audio recording, in the Attachments area, clickRecord Audio > Record. To make adjustments to your microphone pick and volume, clickFlash Settings. To heed to your recording, click Play. To erase your recording, clickArticulate. If you take pre-recorded audio and are using a supported browser, you tin can drag audio files onto the attachments upload target.
- To attach a video recording, in theAttachments area, clickRecord Video >Allow >Record. When you finish recording, clickStop. Click Clear to erase your recording or Add to add the recording. If you have pre-recorded video and are using a supported browser, you can drag video files onto the attachments upload target.
- Click Mail.
Yous take now replied to a thread within a topic. |
Group Discussions
Enabling a Group Topic Type
Enabling a group topic type allows you to create a single discussion topic that separates students, based on group enrollment, into smaller sub-sections of discussions (i.eastward. a pupil will only be able to post for a select number of peers to see and they will only be able to see posts from these peers). This is the best selection for graded discussions.
NOTES: - Before enabling the group settings on a word topic, you need to create groups in your course.
- The group topic setting can only be enabled upon creation of the topic. Once the discussion settings have been saved, you cannot edit the topic type. This ways if you wanted to change the settings of an existing topic to dissever students into groups, you would need to create a new discussion from scratch and delete/hide the sometime version.
- Log in to Brightspace with your MyCarletonOne credentials.
- On your Brightspace homepage, locate your grade in ane of the following ways:
- Click on your form under My Courses.
- Click the Course selector grid , then search for your course name or select your class from the driblet-downwards menu.
- Click Tools.
- In the drib-down bill of fare, select Discussions.
- Under the Discussions List tab, click the Newbutton.
- In the drop-downwardly menu, select New Topic.
- Under Topic Type, select Grouping or section Topic.
- In the drop down card, choose the group category that you lot wish to group students by.
NOTE:To grouping students past tutorial section, DO NOT USE the Sections topic type. Choosing the Section topic type will give students the option to mail their entry to their tutorial group OR for the entire course to run into. This is because every student is a member of two sections in a class: the course section (e.1000. section A) and their tutorial department (e.g. department A01). If y'all want to separate students past tutorial sections, these groups need to exist recreated in the Groups area of your Brightspace form. Contact TLS for back up to create your tutorials in the Groups area.
- Click Salvage and Close.
Setting Group Restrictions
You will find the group restriction selection nether the "Restrictions" tab of a discussion.
NOTE: It is not recommended to use this setting because information technology does not permit you to group students within a give-and-take, information technology just allows yous to restrict access to a group, meaning you would need to create a new word for each group. This setting is especially important to avoid for graded discussions because you do not want multiple form items for i discussion activity in your gradebook!
The group restrictions choice is non required when using the Group Topic Blazon pick. It is best to only enable the Topic Type option and to leave the grouping restrictions option untouched.
If you have a unique apply case for enabling the Group and Section Restrictions options, it is recommended to achieve out to TLS for support to ensure the settings you lot take enabled are going to work properly for your desired event.
Video Tutorials
Was this page helpful?
92 0fc59231d4
Thank you for your feedback.
no one has found this useful nevertheless.
Posted in Advice and Collaboration, Discussions Share: Twitter, Facebook
Short URL: https://carleton.ca/brightspace/instructors/?p=92
0 Response to "How to Upload Discussion on D2l for Instructor"
Post a Comment